铠装电缆隔爆/防水接头
铠装电缆隔爆/防水接头详细介绍
产品型号名称:
特点参数:是配套钢丝铠装电缆,钢带铠装电缆等特殊电缆配套使用的配套钢丝铠装电缆防水接头,钢带铠装电缆防水接头,用于铠装电缆终端接线或进入接线盒或设备时锁紧铠装电缆的。欢迎采购。现已经广泛用于核电,石化,采矿等行业,除常规产品外,本公司还提供进口防爆铠装电缆防水接头,隔爆铠装电缆防水接头,ATEX认证,EX认证,CE认证等认证齐全,可以在气体 1区, 2区,粉尘 20区, 21区, 22区使用,。
一,


在Ex-E,EX-D和前TA领域使用的危险区域,包括的IECEx认证和ATEX认证,铠装电缆的电缆接头 |
| Available in the following Thread Types:可在以下螺纹类型: | | | | |
 | - Innovative "Interlocking Armor Cone"创新“联锁铠甲锥”
- Zero torsion on cable cores and armor零扭转电缆芯线和装甲
- Fast and easy pre-assembly by hand by the use of profile material with maximum grip快速和容易的预装配型材zui大的抓地力手
|
 | - The Exios Barrier combines outstanding Exios features with flameproof compound.隔爆型复合Exios屏障结合特色突出Exios。 Whenever installation requires a barrier gland (IEC 60079-14 / 10.4.2), your solution is Exios Barrier.每当安装需要一个障碍腺(IEC 60079-14 / 10.4.2),您的解决方案是Exios屏障。
|
 | - According to the latest IECEx and ATEX standards根据的IECEx和ATEX标准
- Ex-d / Ex-e / Ex-ta前-D / EX-E / EX-TA
- Zone 1, Zone 2, Zone 20, Zone 21 und Zone 22 1区,2区,20区,21区和22区
- Gas Groups IIA, IIB and IIC – Apparatus Group III燃气集团IIA,IIB和IIC - 仪器第三组
- Equipment Protection Level GbDa设备防护等级GbDa
- Ex IM2 Ex de I Mb IIC Gb / Ex ta IIIC Da前IM2的前德我MB IIC GB / EX TA IIIC部大
|
- IP 66, 67 and 68 (5 bar), EN 60529符合EN 60529 IP 66,67和68(5条)
- Temperature Range - 60°C to 85°C (- 76°F to 185°F)温度范围 - 60°C至85°C( - 76°F到185华氏度)
- Halogen- and phosphorous-free无卤素和磷
- Silicone Seals and O-Rings as standard硅胶密封圈和O形圈作为标准
|
| 详细参数 |
| 材料 | 原材料黄铜,镀镍黄铜,黄铜与NPB的主题和316不锈钢(可根据要求定做) |
| 密封件/ O形圈 | 有机硅,VQM |
| 夹紧插入 | PA 6 Fire Protection Class V2 per UL 94 |
| 盔甲 | 金属装甲 |
| 温度范围 | -76°F to 221°F (-60°C to +105°C) |
| 防护等级 | IP 68 / 5 bar |
| 可用尺寸 | 公制:M16,M20,M25,M32,M40,M50,M63,M75
NPT:3/8“,1/2”,3/4“1”,1-1/4“,1-1/2”,2“,2-1/2”,3“ |
安装指南:

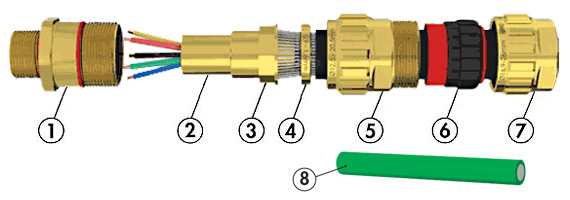 | Components:
1. Entry Component
2. Compound Sleeve
3. Interlocking Armor Cone
4. Armor Clamping Ring
5. Gland Body
6. Outer Jacket Sealing
7. Dome Nut
8. Compound | Certification Details:
Operating temerature rage - 60°C to 85°C (- 76°F to 185°F)
Ingress protection rating IP 66, 67, 68 (5bar) Gland Type: EXIOS Barrier
I M2 Ex d Mb / Exe I Mb
II 2G Ex d IIC Gb / Ex e IIC Gb
II 1d eX TA IIIC Da IP 66 /67/68
IECEx: Nr. Sir 11.0044X
ATEX: Nr. Sira ATEX 1110X
EN/IEC 60079-0/2009
EN/IEC 60079-1/2007
EN/IEC 60079-7/2007
EN/IEC 60079-31/2009
EN 60529 | |  | Step 1
The cable is to be prepared as shown in Fig. 1. For L1 dimension see table. Choose measurement L2 depending on the installation. The inner cable jacket (A2) must be free of damage and should extend beyond the cable gland.
Important: The Exios Barrier Cable Gland is typically designed for use with armored cables. However it is also possible and permitted to use with NON-ARMORED cables. In this case it is important to use one clamping ring as a spacer for the installation! |  | Step 2
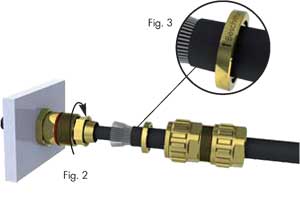
The cable gland is delivered with 2 armor clamping rings. Choose the appropriate clamping ring (measure armor thickness and see Table 1); the other ring can be discarded. Follow the installation instructions shown in Fig. 2. Pay attention to the correct installation of the clamping ring, Fig. 3. The arrow on the clamping ring should point towards the installation.
Step 3
Install the entry component on the device or housing (∼15Nm / 11.6 foot pounds). The end-user is responsible for ensuring that, at the point of installation, the adapter for the entry component has been made ready in accordance with Regulations. The entry component can be provided with a locknut to keep it from working loose. |  | Step 4
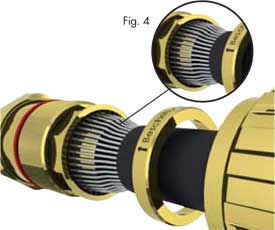
Position the armour of the cable so that all parts of the armor are in contact with the armor cone (Fig. 4) and the ends of the armor touch the edge of the armor cone. Now screw the gland body hand-tight onto the entry component. It helps if, while doing so the cable is pushed slightly in towards the device or housing. With the appropriate open-ended spanner (tool), tighten fast in order to securely clamp the armor. |  | Step 5
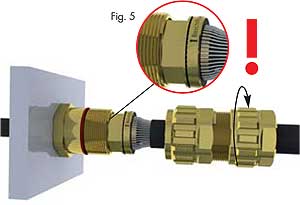
Loosen the gland body and check for correct seating of the armor (Fig. 5). The armor must be firmly clamped. If need be, repeat step 4.
Preparing the Compound: Please check the compound expiration date. Read the attached Safety Data sheet. Use the protective gloves included, as well as suitable eye protection. The compound can be applied at temperatures between +10C and + 40C. Application is ideally carried out at room temperature (+20C). Processing time is approx. 15 min. Please see Table 2 for Cure Time of the Compound. |  | Step 6
Mix and knead the appropriate quantity of compound for the job until a compley uniform color is achieved. As shown in Fig. 6, apply the compound between and around the individual conductors. To prepare for the sleeve (cover) it is easy if the compound has first been giving a conical shape as in Fig. 7. To stop the conductors moving out of place, they can be held together with scotch tape. |  | Step 7
Push sleeve over compound portion behind armor cone. This causes the compound to be compressed. Remove the excess compound. Care should be taken that sleeve has been filled right up to the end. The outside of the sleeve is to be kept clean. |  | Step 8
The cable can now be inserted into the entry component. The sleeve should be inserted carefully. |  | Step 9
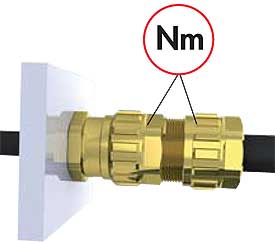
After the entry component and the gland body have been screwed together again (Step 4, Nm), the dome nut can now be tightened. To speed up assembly, it can be tightened by hand to start with. Then tighten down using an open-ended spanner (Nm). | |
二,非隔爆防爆铠装电缆接头:
 | - "创新“联锁铠甲锥”
- 零扭转电缆芯线和装甲
- 快速和容易的预装配型材zui大的抓地力手
|
 | - 双密封在内部和外部电缆护套
护甲接受的范围从0毫米 - 2.5毫米
- zui大夹持范围
|
 | - 根据的IECEx和ATEX标准
- Ex-d / Ex-e前-D / EX-E
- Zone 1, Zone 2, Zone 20, Zone 21 und Zone 22 :1区,2区,20区,21区和22区
- Gas Groups IIA, IIB and IIC – Apparatus Group III燃气组IIA,IIB和IIC - 仪器第三组
- Equipment Protection Level GbDa设备防护等级GbDa
|
- IP 68 5 bar, EN 60529 :IP 68 5巴,EN 60529标准
- 温度范围-76°F至221°F(-60°C至+105°C)
- 无卤素和磷
- 标准硅胶密封圈和O形圈
|
| We Can Cross:我们可以超越: | |

Download - 4 Page Flyer 下载- 4页资料 |
| 详细参数 |
| 材料 | 原材料黄铜,镀镍黄铜,黄铜与NPB的主题和316不锈钢(可根据要求定制) |
| 密封件/ O形圈 | Silicone,有机硅,VQM |
| 夹紧件 | PA 6尼龙塑料 防火等级:V2 UL 94 |
| 盔甲 | 金属装甲 |
| 温度范围 | -76°F to 221°F (-60°C to +105°C) -76°F至221华氏度(-60°C至+105°C) |
| 保护等级 | IP 68 / 5 bar IP 68/5巴 |
| 可用尺寸 | 公制:M16,M20,M25,M32,M40,M50,M63,M75
|
防爆铠装电缆接头安装指南:

 |
Components: 组件:
1. 项组件
2.内夹克密封的
3. 联锁铠甲锥
4. 护甲夹紧环
5. 腺体
6.外套密封
7. 圆顶螺母 | 认证详情:
电缆接头类型:EXIOS
II 2G Ex de IIC Gb / II 1D Ex ta IIIC Da,IECEx: Nr. IECEx认证:NR。 BVS 10.0078X BVS 10.0078X
ATEX: Nr.防爆:NR。 BVS 10 ATEX E062X BVS 10 ATEX认证E062X
EN/IEC 60079-0/2009
EN/IEC 60079-1/2007
EN/IEC 60079-7/2007
EN/IEC 60079-31/2009
EN 60529 EN | |
 | 第1步
电缆接头是要准备图所示。 1. 看到的L1尺寸表。 .选择适当的长度。 电缆护套(A2)的必须是无损害的,应超出电缆压盖。 |
 | 第3步
安装在设备上的入境组件或住房(?15NM / 11.06英尺磅))。 zui终用户是负责确保安装点,为进入组件适配器符合规定的。条目组件可以提供一个锁紧螺母,以保持它转向宽松。 |
 | 第4步
.位置的电缆的铠甲,使所有的零部件接触装甲锥(图4)和装甲触摸两端的边缘的装甲锥是装甲。 .手头紧,到进入组件拧腺体。 这样做时,它可以帮助如果电缆被压在对设备或房屋轻微。适当的开放式扳手(工具),以装甲安全钳拧紧。 |
 | 第5步
开的腺体和检查装甲正确定位(图5)。 装甲必须牢牢夹住。 4.如果需要,重复步骤4。 |
 | 第6步
.入世后组成部分,腺体已再次拧紧(步骤4米),圆顶螺母,现在可以收紧。了加快组装,也可以用手拧紧开始。 |
铠装电缆防爆/防水接头常规规格型号表如下:安装指南请咨询
三,其他常规/防爆电缆接头如下:
若需要其他材质,如:尼龙塑料,PVDF,黄铜镀镍,不锈钢,锌合金,
其他螺纹制式,如:M螺纹,PG螺纹,NPT螺纹,G螺纹,
其他要求,如:加长,防折,抗拉,多孔,扁平,直角,EMV,EMC电磁兼容,耐高温,耐低温,耐高压,防爆,隔爆,铠装。
附件,如:堵头,变径。
索取选型资料。
| 材料 | 黄铜、镀镍 |
| 花键镶嵌件 | PA |
| 成型包装 | NBR |
| O型圈 | NBR |
| 防护级别 | IP 68 – 10 棒 / IP 69K
夹持范围内 |
| 连续运行温度 | -40 °C – 100 °C |
| 材料 | PA V0符合UL 94标准 |
| 成型包装 | NBR |
| 防护级别 | IP 68 – 10 巴 / IP 69K
夹持范围内
仅带可选O型圈 |
| 连续运行温度 | -40 °C – 100 °C |
| 交货颜色 | 灰色 RAL 7035 |
螺母
电缆直径以mm(毫米)计算

广州兴工智能科技有限公司
:(10线)
答疑1:2693332967
答疑2:2294758553


