沃尔沃VCS 1029,54719涂料高压喷水粘附性测试
时间:2019-09-19 阅读:1418

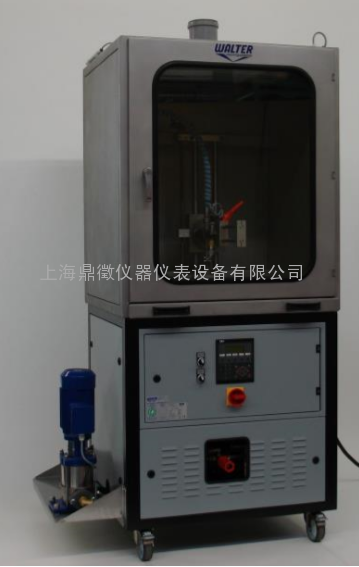
蒸汽喷射试验机满足测试规范汽车厂家:宝马、奔驰、通用、大众、福特、沃尔沃等规范(AA-0136、DIN 55662、ISO16925,DBL 7381,GM9531P、PV1503、VOLVO STD 423-0015,VOLVO VCS 1029 54719、FLTM BO 160-04、MS210-07,PSA D23 5376,Renault D25 2018/-A-2001 ,GMW16745-2012方法B,TPJLR-52.561-2009)
| The English language version is the original and the reference in case of dispute. | 英文版本为原件,出现争议时应予以参考。 |
| TEST METHOD | 测试方法 | ||
| Adhesion, water spraying under high-pressure | 粘附性,高压喷水 | ||
| Paints and enamels | 涂料和搪瓷 | ||
| Orientation | 简介 | ||
| This issue differs from issue 1 in that an alternative for when scribing shall be made has been included. Furthermore, the manufacture of the spray nozzle has been specified, and the material for calibration has been changed. Handling after moisture exposure has been clarified. | 本版本与第1版的区别在于包含了划线的替代方法。 此外,已经规定了喷嘴的制造程序,已经更改了校准的材料。已经澄清了暴露于潮湿环境后的处理程序。 | ||
| 1 Scope and field of application | 1 应用范围和领域 | ||
| This test method is used for assessing the adhesion between paint films and between paint film and substrate respectively. The method is intended to simulate the strain and load that the paint films are subjected to during high-pressure cleaning. | 本测试方法用于评估漆膜之间以及漆膜和基材之间的粘附性。本方法预计用于模拟漆膜在高压清洗条件下可能受到的应变和负载。 | ||
| 2 Apparatus and test object | 2 装置和测试对象 | ||
| - Test equipment of high-pressure type, brand NIFAB, model HTT-1, or equivalent test equipment | - 高压型测试设备,NIFAB牌、HTT-1型,或者其他等效测试设备 | ||
| Water pressure: | min. 150 bar | 水压: | 低150巴 |
| Spraying distance: | 0-150 mm | 喷射距离: | 0-150mm |
| Sweeping frequency: | 1 sweep/s | 清扫频率: | 每秒清扫一次 |
| Water temperature: | 50 ± 5 °C | 水温: | 50 ± 5℃ |
| Spray nozzle: | No 2506 (flat jet 25°) Spraying Systems Co. | 喷嘴: | No 2506(扁平射流25°),由Spraying Systems Co.生产 |
| Lance length: | 300 ± 50 mm | 喷杆长度: | 300 ± 50 mm |
| Test piece holder withcentre hole, size of hole: | Æ 40 mm | 带有中心孔的试样固定器,孔径为: | Æ 40 mm |
| - Test object |
| ||
| a) Test panel 100 x 200 mm of the substrate in question, surface coated with the relevant paint system. A minimum of two panels shall be tested. A minimum of three crosses distributed between the two panels shall be tested. | a) 测试面板,100 x 200 mm(相关基材);表面涂有相关的涂料系统。至少测试两块面板。至少测试分布于两块面板之间的三道十字标记。 | ||
| b) Test part of the relevant substrate, surface coated with the relevant paint system. In order to have significant results, test pieces should be taken from different areas on at least two test parts. A minimum of four crosses shall be tested for each part. | b) 测试零件(相关基材),表面涂有相关的涂料系统。为了获得显著性结果,至少应从两个测试零件上的不同区域采集试样。每个零件至少测试四个十字标记。 | ||
| - Scribing tool, edge width 0,5 mm and geometry according to VCS 1021,29. |
|
| 3 Preparation for test | 3 测试准备 |
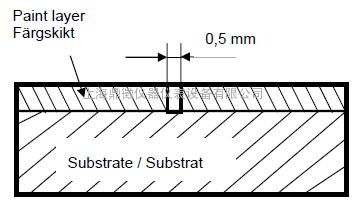
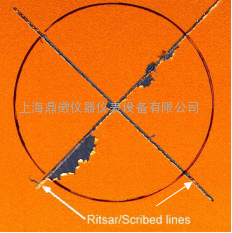
| The test panels shall be conditioned in accordance with VCS 1021,19. Before testing the adhesion, an initial paint damage shall be made on the test object by scribing two 0,5 mm lines using a scribing tool. The scribed lines shall be made down to the substrate, at right angles to each other to create a cross, see fig. 1. The scribed lines shall extend outside the test area. Each scribed line shall be approx 60 mm. A cross section of a scribed line is shown in fig. 2. IMPORTANT – The edges of the scribed lines must be at right angles to the substrate. | 应按照VCS 1021,19的要求对测试面板进行调节。测试粘附性前,应使用划线工具在测试对象上划两根0.5mm的线,作为初始涂料损坏。划线应向下划至基材,并相互垂直以生成一个十字图案,参见图1。划线应延伸至测试区域外。 每条划线应约为60mm。划线的横截面如图2所示。 重要信息——划线的边缘必须与基材垂直。 |
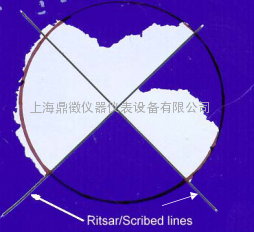
| 5 % flaking / flagning 5%的剥落 | 60 % flaking / flagning 60%的剥落 |
|
|
| B1 | B2 |
Fig. 1 Principle layout / Principskiss
图1:原理布局

Fig. 2Cross section of sample with scribed line / Tvärsnitt av prov med rits
图2:带划线的样品的横截面
| As the adhesion test is to be made after moistureexposure (wet adhesion), the test object shall first beexposed in a tropical cabinet in accordance withVCS 1027,33759 for the period specified in therequirement specification. | 由于粘附性试验需在暴露于潮湿环境中之后进行(湿粘附性),测试对象应首先按照VCS 1027,33759的要求暴露于热带机柜中,暴露时间参照要求规格说明中的规定。 |
| For metal substrates, the testing shall be performedimmediately after exposure, without any recovery. Inpractice, this means that the panels can be storedmaximum 60 min in a vessel filled with water of roomtemperature to keep them humid until testing. Theshortest possible time shall be aimed for. | 对于金属基材,应在暴露之后立即进行测试(无任何恢复)。在实践中,这就意味着面板可在室温条件下储存在充满水的容器中长60min,以便保持其在测试前的潮湿状态。时间尽可能短。 |
| As far as plastics substrates are concerned, they shall be stored for 1 h in a constant-temperature controlled cabinet at standard atmosphere (23 ± 2 °C, 50 ± 5 % RH) instead of storage in a water-filled vessel. This shall be done to allow the material to recover. The testing shall then take place within approx. 15 min. | 如果涉及塑料基材,应在标准大气环境中(23±2℃,50±5%RH)将其储存在恒温控制机柜中1h,而不是充满水的容器。这样做的目的是让材料恢复。然后应在约15min内进行测试。 |
| The scribing shall be made prior to the moistureexposure. For metal with paint or other organicsurface coating, scribing can alternatively be madeafter moisture exposure. In the latter case, anagreement shall be made between test requester andtest responsible. The report shall state when thescribing was made. | 应在暴露于潮湿环境中之前进行划线。对于带有油漆或其他有机表面涂层的金属,也可以在暴露于潮湿环境中之后进行划线。对于后者,测试请求人和测试负责人应达成协议。报告中应说明进行划线的时间。 |
| 4 Test procedure | 4 测试程序 |
| Place the test object in the test piece holder. Then fixthe test piece holder’s hole (∅ 40 mm) centrally abovethe initial damage. It is important that the scribedcross is correctly positioned in front of the jet, see fig.3. The following parameters apply; the nominal valuesare target values: | 将测试对象放在试样固定器上。然后将试样固定器的孔(∅40 mm)固定在初始损坏中心上方。将划出的十字标记正确地放置在喷嘴的前方非常重要,参见图3。下列参数适用;标称值即为目标值: |
| − The water jet shall sweep over the test surface(± 20 mm) with an angle of deflection of 5,6° fromthe nozzle tube’s centre of rotation(N.B. – No parallel displacement) | − 喷水器应以5.6°的偏向角从喷嘴管的旋转中心扫过测试表面(±20mm)(注意:无平行位移) |
| − Distance between nozzle and test surface (90°):100 ± 3 mm | − 喷嘴和测试表面之间的距离(90°):100 ± 3 mm |
| − Water pressure: 120 ± 3 bar | − 水压:120 ± 3 bar |
| − Water flow: 15,0 ± 0,3 l/min | − 水流量:15.0± 0.3 l/min |
| − Water temperature: 50 ± 5 °C | − 水温:50 ± 5℃ |
| − Number of sweeps during 30 s: 30 ± 2 | − 30秒内的清扫次数:30 ± 2 |
| − Sweeping width: ± 20 mm (diameter of the testpiece holder’s centre hole) | − 清扫宽度:± 20 mm(试样固定器的中心孔的直径) |
| If the test panel temperature varies between thedifferent sprayings, the result can sometimes beinfluenced. Before spraying, the panel shall thereforebe of room temperature 18 - 28 °C. This applies toeach cross. | − 如果测试面板的温度在不同喷水过程中发生变化,则有时会对结果产生影响。因此,在喷水前面板应为室温(18-28℃)。该项要求适用于所有十字标记。 |
| 5 Assessment | 5 评估 |
| After completed test, the object shall be wiped dry and the extension of the paint damage shall be established. The test result shall be given in per cent flaked paint surface. 100 % is defined as the circular area (0 40 mm) centred on the scribed cross, see fig. 1, (1256 mm2) minus the scribed line area of 40 mm2. | 完成测试后,将测试对象擦干并确定油漆损坏的延伸。测试结果应以剥落的油漆表面的百分比给出。100%定义为以划出的十字标记为中心的圆面积(Φ40mm),参见图1(1256mm2),减去划线的面积(40mm2)。 |
| The requirement shall be met for each scribed cross. Mean values for the entire part/panel shall NOT be calculated. | 每个划出的十字标记均应满足要求。不应计算整个零件/面板的平均值。 |
| 6 Report | 6 报告 |
| The test report shall include the following: | 测试报告应包含以下内容: |
| a) Type and designation of test material | a) 测试材料的类型和名称 |
| b) Test result in per cent (for each test objectrespectively). Ranges can be given if the result is approved according to the requirement specification. The number of rejected samples shall be noted. | b) (每个测试对象对应的)测试结果,百分比。根据要求规格说明,如果批准了结果,则可以给出范围。应记录被拒绝的样品的数量。 |
| c) Testing in accordance with VCS 1029,54719 | c) 按照VCS 1029,54719的要求执行的测试 |
| d) If scribing was performed before or after moisture exposure, if any | d) 划线在暴露于潮湿环境中之前还是之后执行(如有)。 |
| 7 Calibration | 7 校准 |
| Unless otherwise specified, calibration and inspection of the nozzle’s spray pattern shall be made with an interval of 90 days. | 除非另有规定,否则应以90天的时间间隔执行喷嘴的喷射形式的校准和检查。 |
| Calibration is performed by subjecting a test panel (approx. 100 x 200 mm) of low-density polyethylene as per STD 1211,05or equivalent material to high- pressure cleaning for 30 s without the use of a test piece holder. The nozzle must not oscillate. The following parameters apply: | 校准的执行方法为:对低密度聚乙烯测试面板(约100 x 200 mm)(按照STD 1211,05)或者其他等效材料执行高压清洗30s,不使用试样固定器。喷嘴不得振动。下列参数适用: |
| − Angle between nozzle and test surface: 90° | − 喷嘴和测试表面之间的夹角:90° |
| − Distance between nozzle and test panel: 100 mm ± 3 mm | − 喷嘴和测试表面之间的距离:100 mm ± 3 mm |
| − Water pressure: 120 bar ± 3 bar | − 水压:120 bar ± 3 bar |
| − Water flow: 15,0 ± 0,3 l/min | − 水流量:15.0 ± 0.3 l/min |
| − Water temperature: 50 ± 5 °C | − 水温:50 ± 5℃ |
| The nozzle’s spray pattern is determined by measuring the length and width of the damage on the test panel caused by the spraying as well as checking its appearance. | 通过测量测试面板上因喷水造成的损坏的长度和宽度,以及检查其外观等方式确定喷嘴的喷射形式。 |
| To be approved, the spray pattern shall be continuous, have a length of 63,0 ± 5 mm and a width of min 3,0 mm, and it shall be contained between two parallel lines, 7,0 mm apart (see fig. 4). | 待批准:喷射形式应连续,长度为63.0 ± 5 mm、宽度为3.0mm,并且其应处于两条间隔为7.0mm的平行线之间(参见图4)。 |

Fig. 3The cross mark shows schematically the position of the scribed lines cross damage in relation to the vertical flat jet.
图3:十字标记以图示的形式显示了与垂直的扁平射流有关的划线十字损坏的位置。

Fig. 4 Damage from spray
图4:喷射造成的损坏


